Frankie Popcorn Bucket Diorama
Welcome everyone to my Frankie Popcorn Bucket Diorama Instructable. I hope you will enjoy the tutorial just as much as I enjoyed writing it and building the diorama! So without further delay, let's dive right in.
Origin of the Project
So my coworkers entered an office decorating contest for Halloween last year and they won first prize. The prize is a popcorn bucket from Universal Studios, they were rewarded the item and then wanted to make some kind of stand or plaque for the figure, and that is when I stepped in to help.
I thought it would be a great idea and great practice to create a stand that Frankie could live in and be displayed, yes I know it is Frankenstein's monster but for the sake of the tutorial I will make call the monster Frankie.
STEP 01 Assembly
So I had a few pieces of Foamular 150 left over from a previous project that were perfect for this one, I used 3 pieces to form a 3D space that was relative to Frankie's stature. I then used masking tape to hold the pieces together while I lightly sketched the lines on the top with a pencil that would become the "rough walls". Once I was happy with that I was able to move on to the next part of the project.
STEP 02 Detailing the Foam
From here I was able to measure equally spaced horizontal lines on the two walls. Wall A and wall B were laid flat on my work table, and I used my ruler and pencil to create the lines that would simulate bricks into the foam. Once this was complete the piece looked a little plain, I knew I wanted Frankie to be the centerpiece of the diorama but at the same time I wanted the diorama to have its own character that would compliment Frankie.
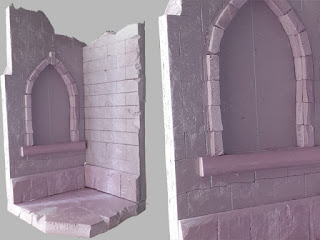
I decided to carve out a window on wall A that would add character to the diorama, and still leave space on wall B and the floor in case my work buddies wanted to add some sort of commemorative plate or label. To do this I used a sheet of paper, folded it in half, drew the rough outline of a window, and cut the shape out. I then traced the shape on the foam and used the Utility Knife to cut out the shape. Once the shape was cut out, I then placed it back in only part of the way to create the illusion of depth.
STEP 03 Texture and Glue Up
Once I was happy with the over all look and layout of all 3 pieces, I began to add more detail in the form of cracks, bumps, and damage as if the walls were ancient. To achieve this look I balled up a piece of aluminum paper and rolled it all over the foam with some pressure to create the indentation in the foam. I then used a combination of Xacto and Utility Knives to create further damage and gouged out foam in an artistic manner ( only where is made sense ). After that I glued all the pieces together and let it dry.
STEP 04 Bricks and Bits
The other little bits of "bricks" and wall trims were created in the same way I demonstrated in the previous steps. Cut, texture, damage, glue. When everything was nice and dry I moved on to seal and paint.
STEP 05 Mod Podge and Paint
I mixed some black acrylic paint with Mod Podge and sealed the foam, I used to use straight Mod Podge but picked up the trick of adding paint from Black Magic Craft who uses the same technique. It not only covers your piece with a seal, but it also helps in the painting process, along with giving you a visual clue as to what is already covered, I highly recommend doing this in all your projects!
I allowed the mixture to dry, and then I covered the entire diorama in black acrylic paint. I allowed that to dry too and then moved on to dry brushing gray, greens, dark gray, and whites on to the piece. When that dried, I went back in with washes to simulate weather and rain, spattered light and dark colors to further simulate grim and rot.
When all that was dry, I went over the piece with a coat of Matte Mod Podge to seal in all the flavor, and called it done!
Closing Notes
I really enjoyed making this thing, and it only took 4 - 5ish hours. I presented the diorama today and everyone loved it, which makes me happy to know I created exactly what they wanted, so from BOT10ART to the hardworking decoration crew, cheers to you and congratulations!


cool :)
ReplyDelete