
Custom Orlando City LEO Gundam Model
Welcome to my tutorial on making a custom Gundam Model Kit that is perfect for any collector of toys or sports memorabilia!
 First thing to tackle is the building of the model itself, these kits come in an assortment of styles and sizes and for this build I chose the 1/144 scale model which means the figure is about 4-5 inches in height.
 Next step is to disassemble the model kit and get it ready for priming. This is needed so that other colors can adhere to the smooth plastic parts. Some recommend to wash the parts in warm soapy water and then let the parts thoroughly dry before using any kind of primers.
 Once all your pieces are primed and painted you are ready to assemble the model again. I wait a total of 24hrs between paint jobs meaning 24hrs after priming, and then another 24hrs after paint.
 For this custom figure I asked my friend Ketsiable Crafts to cut out a sticker on her Cricut machine.
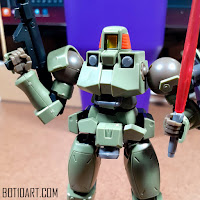
So lets get started, I purchased the OZ-06MS LEO 1/144 Scale model Gundam kit at my local art supply store and began the process of transforming this piece into a work of art.

The model kit comes in pieces so assembly is required however, no adhesive is needed unless you are customizing the figure. In the box are pieces of plastic that hold all the parts called runners.
These are fun for kids to build since the pieces are already the color of the characters and if you desired you can just build the model and shelf it.

For my builds I skip this part, for commissions I do not! So all the parts are clean and ready for paint. For primer I use a standard rattle can 2X primer by Rustoleum. Other modelers use Tamiya, or other brands designed for model kits but I have not found any significant difference as long as the paint is applied in light even coats.

At this point I assemble the model and begin applying the decals of the model, many decals can be found online but I use MegaDecals for the Gundam models the choice and preference is yours of course.
The main thing to remember is that you will need to apply a clear coat or top coat to the model before and after you apply your stickers and decals. This not only hides the edges of the decals but it also helps to encapsulate the decals and stickers in a protective layer that prevents chipping and scratching. Granted nothing if foul proof but every little bit helps.

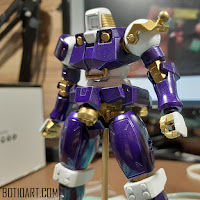
At this point I place all the final touches and the model kit is ready to be shipped to the client or displayed for everyone to see.
Thank you for reading this tutorial, I hope it sparks interest in building model kits and you find them fun to build as I do!
If you are interested in a custom Gundam model build of your own you can commission me via email, please contact me by clicking I WANT ONE!

Comments
Post a Comment